- The Best Way to Create a Lower Thirds Template That Can Be Used Anywhere
- What Are Lower Thirds and Why Are They Essential?
- Tools You’ll Need to Create Lower Thirds
- How to Create Lower Thirds in Adobe Premiere Pro
- Setting Up Your Workspace
- Designing a Lower Third Using Essential Graphics
- Animating Text and Graphics
- Saving and Reusing Templates
- How to Make Lower Thirds in Adobe After Effects
- Setting Up a New Composition
- Using Shape Layers and Text Tools
- Adding Animations and Effects
- Exporting Lower Thirds for Use in Other Software
- How to Export Lower Thirds for Maximum Compatibility
- How to Import and Use Lower Thirds in Premiere Pro
- Best Practices for Designing Effective Lower Thirds
- Common Mistakes to Avoid When Creating Lower Thirds
- FAQs About Creating Lower Thirds Templates
- What is a lower third in video editing?
- How do I create lower thirds in Premiere Pro?
- What are the best settings for exporting lower thirds in After Effects?
- How can I make reusable lower thirds templates?
- What fonts and colors work best for lower thirds?
- Can I import After Effects lower thirds into Premiere Pro?
- What file formats are ideal for lower thirds templates?
- How do I animate text in lower thirds?
- What are common mistakes to avoid when creating lower thirds?
- How do I ensure my lower thirds are compatible with all devices?
The Best Way to Create a Lower Thirds Template That Can Be Used Anywhere
Lower thirds are a powerful way to add essential information, branding, and style to your videos. By including concise text and graphics at the bottom of the screen, you can let viewers know who’s speaking, provide relevant details, or reinforce branding. In this guide, we’ll walk through everything you need to know about creating lower thirds that can be reused in any project—from how to make lower thirds in Premiere Pro to how to export lower thirds in After Effects.

What Are Lower Thirds and Why Are They Essential?
Lower thirds are graphic overlays that appear in the lower section of a video. They typically include text such as a person’s name, title, or important supporting information. This element is crucial in interviews, tutorials, news segments, and virtually any form of video content where clarity and professionalism matter.
By integrating lower thirds, you can:
- Give viewers immediate context about who or what they’re watching
- Enhance your brand identity with consistent colors, fonts, and styles
- Elevate your video’s professionalism, making it more appealing and trustworthy
Whether you want to learn how to add lower thirds in Premiere Pro or need to design them from scratch in After Effects, these overlays are a cornerstone of effective video storytelling.
Tools You’ll Need to Create Lower Thirds
Before diving into the creation process, make sure you have the following:
- A computer with an internet connection
- Adobe Premiere Pro or a similar video editing program (e.g., iMovie, Final Cut Pro)
- Adobe After Effects (if you want to create and animate more advanced lower thirds)
- Basic familiarity with video editing concepts
- Optional: Adobe Illustrator or Photoshop for custom graphic elements
You can also find design resources online if you’re not confident in creating your own graphics. However, understanding the workflow is key, whether you choose to build templates from scratch or simply import them.
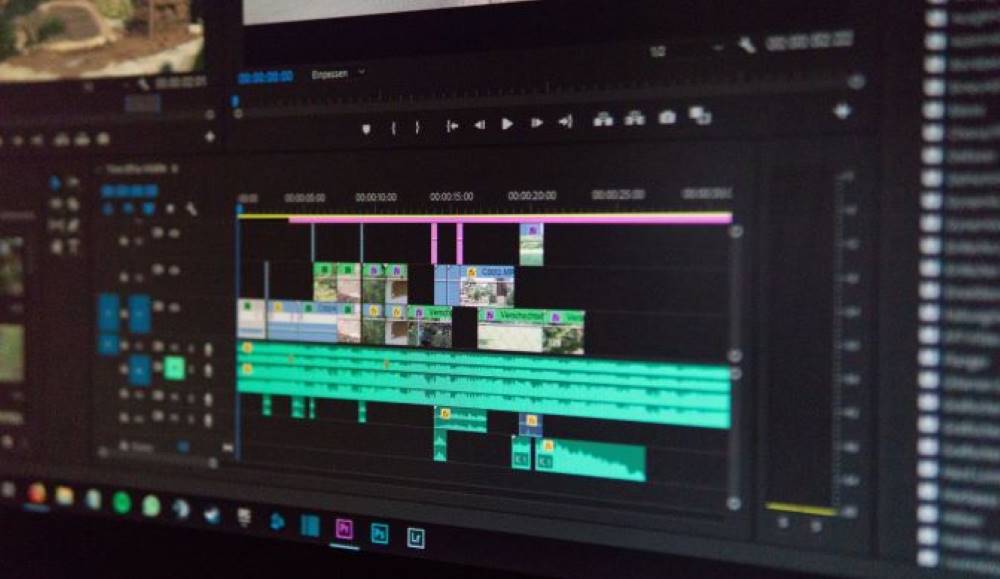
How to Create Lower Thirds in Adobe Premiere Pro
Many users want to know how to create lower thirds in Premiere Pro because it’s a straightforward process thanks to the Essential Graphics panel. If you’ve ever wondered how to add lower thirds in premiere pro or how to make lower thirds in premiere pro, here’s a step-by-step guide.
Setting Up Your Workspace
To start:
- Open Adobe Premiere Pro and create a new project.
- Import your video footage into the timeline.
- Go to Window > Workspaces > Graphics to enable the Essential Graphics panel.
This layout gives you quick access to the tools you need to design and animate your lower thirds.
Designing a Lower Third Using Essential Graphics
Once your workspace is set:
- Select the Type Tool (T) from the toolbar and click on the Program Monitor to create a text layer.
- Type in the text you want to display, such as a name or title.
- Use the Essential Graphics panel to adjust font, size, color, and alignment.
- You can also add shapes or import logos and other graphic elements to enhance the design.
At this point, you’ve taken the initial steps in how to make a lower third in Premiere Pro with basic text and graphics. If you ever hear someone ask “how to make a lower third in premiere?”, this simple approach is an excellent starting point.
Animating Text and Graphics
To give your lower thirds more polish:
- Select your text layer and open the Effect Controls panel.
- Add basic transforms like position, scale, or opacity keyframes.
- Animate these properties over time to create smooth transitions—such as a slide-in from the left or a simple fade-in/out effect.
While this might be enough for many users, you can take your animations further in After Effects if you’re seeking more complex motion. However, Premiere Pro’s Essential Graphics panel is sufficient for most “clean and modern” lower third designs.
Saving and Reusing Templates
- Once you’ve designed and animated your lower third, you can save it as a template:
- In the Essential Graphics panel, click on Export As Motion Graphics Template.
- Give your template a name and choose a save location (such as your local drive or Creative Cloud Library).
You can later import lower thirds in Premiere Pro projects by browsing your library or local drive for the saved Motion Graphics Template (.mogrt).
This method makes it simple to reuse your designs across different projects without having to recreate your lower thirds from scratch.
How to Make Lower Thirds in Adobe After Effects
Adobe After Effects offers more advanced motion graphics capabilities, allowing you to craft complex animations and effects. If you’re curious about how to make a lower third in After Effects or how to make lower thirds in After Effects, follow these steps.
Setting Up a New Composition
To begin:
- Open Adobe After Effects and select File > New > New Project.
- Go to Composition > New Composition and set your desired width, height, and frame rate. Match the aspect ratio of your final video (e.g., 16:9 for most modern videos).
- Set the duration for how long you want your lower third to appear—usually 5 to 10 seconds.
Using Shape Layers and Text Tools
To create the basic elements of your lower third:
- Go to Layer > New > Text to add text layers. Customize the font, color, and size in the Character panel.
- Use Layer > New > Shape Layer to add rectangles, lines, or other shapes for design elements.
- Position these elements at the lower portion of the composition, ensuring they don’t obstruct critical visuals.
Adding Animations and Effects
After Effects excels at animation. To animate your lower third:
- Select a layer (text or shape) and press P for Position or T for Opacity to set keyframes.
- Create an entry animation, such as a slide-in from the left or a fade-in from 0% opacity.
- To add more complexity, consider effects like Drop Shadow, Glow, or Gradient Overlay.
- Use the Graph Editor for smoother easing and more control over the motion.
This process demonstrates how to make a lower third in After Effects with simple text and shape animations. But remember, you can push it further with advanced techniques like track mattes and 3D layers.
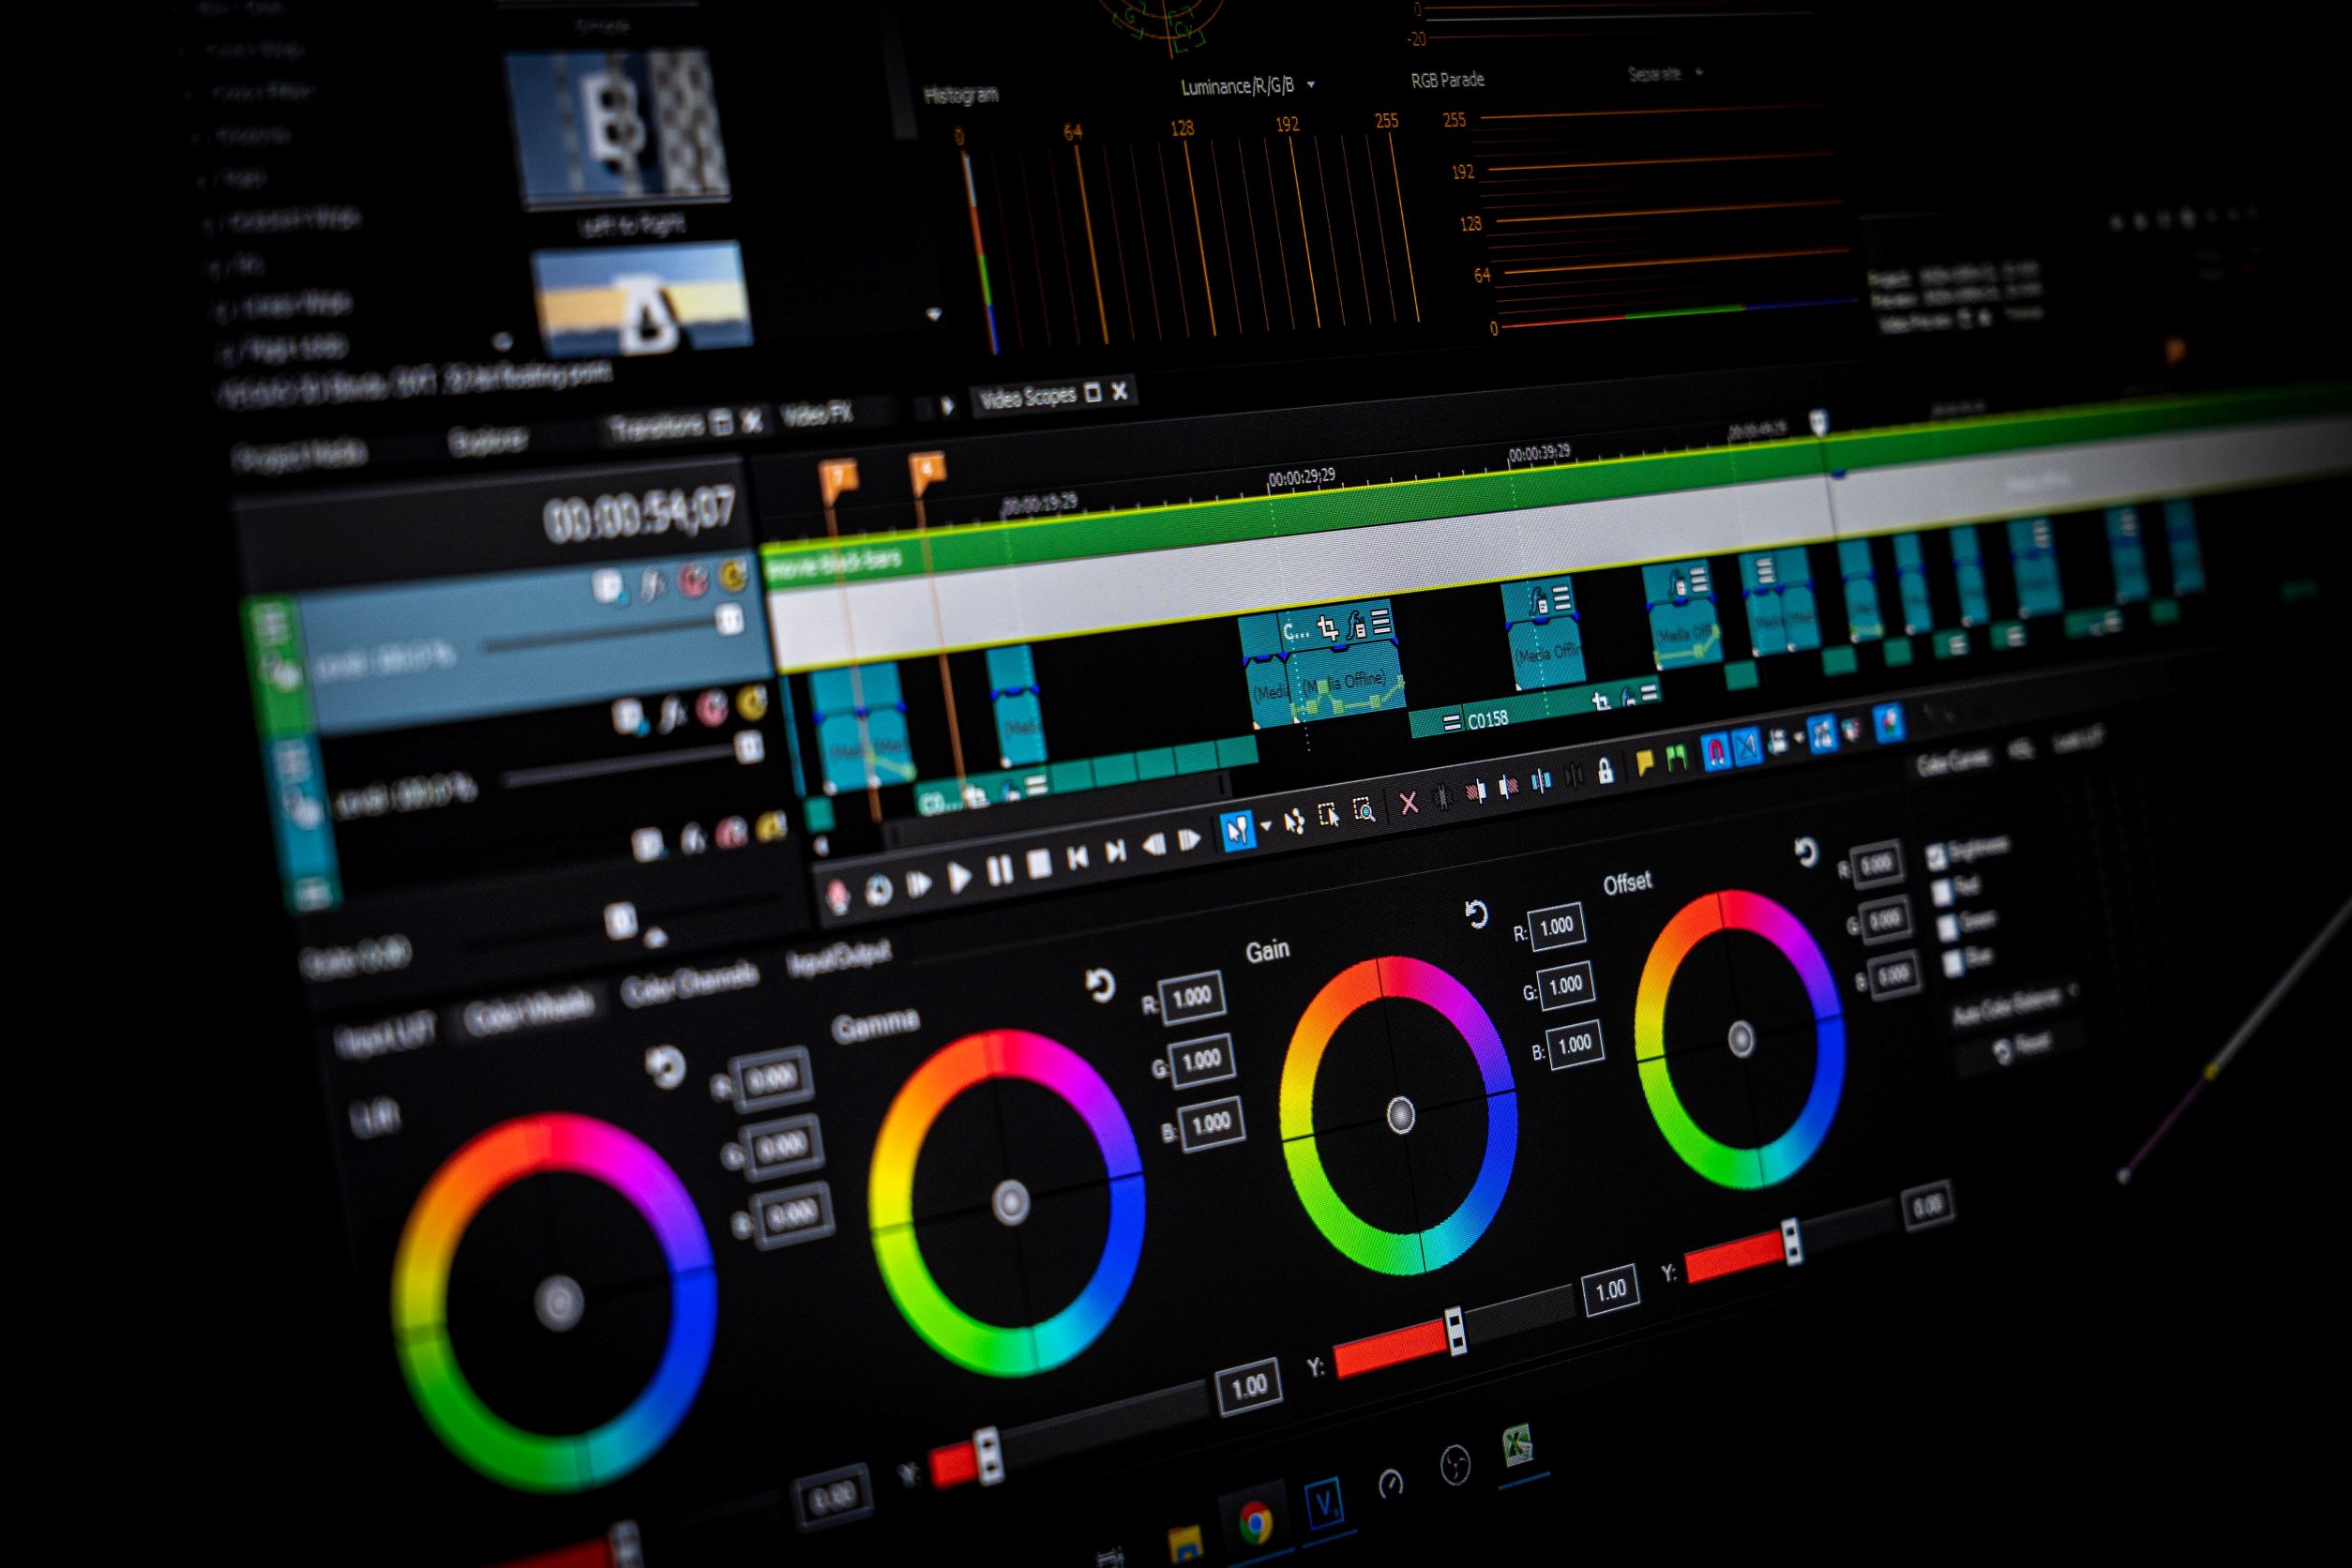
Exporting Lower Thirds for Use in Other Software
Once you’ve finalized your design, you’ll need to know how to export lower thirds in After Effects for maximum flexibility:
- Go to Composition > Add to Render Queue. In the Render Queue, choose a high-quality format like QuickTime with alpha channel support (e.g., ProRes 4444) if you want a transparent background.
- Alternatively, export as a Motion Graphics Template to use directly in Premiere Pro.
By understanding how to make lower thirds in After Effects and export them properly, you can easily transfer your designs to Premiere Pro or any other editing program.
How to Export Lower Thirds for Maximum Compatibility
Whether you’re using Premiere Pro or After Effects, the key to wide compatibility is maintaining a transparent background (alpha channel) and using a format most editing software supports. Popular choices include:
- QuickTime (with ProRes 4444 codec)
- PNG sequences (if you prefer image sequences over video files)
- Motion Graphics Templates (.mogrt) for direct use in Premiere Pro
Make sure you set the correct bit depth and alpha channel settings. Also, if you’re making an essential graphic in Premiere Pro, you can export it as a .mogrt, which is both efficient and widely supported within the Adobe ecosystem.
How to Import and Use Lower Thirds in Premiere Pro
For anyone wondering how to import lower thirds in Premiere Pro, the process is simple:
- Navigate to the Essential Graphics panel.
- Click the Browse tab and select the folder icon at the bottom right.
- Locate your .mogrt file or other motion graphic file and click Open.
- Drag and drop the newly imported graphic into your timeline.
Once imported, you can customize text, colors, and duration directly in Premiere Pro—making it easier to adapt the same lower third design across multiple videos.
Best Practices for Designing Effective Lower Thirds
Crafting an appealing and functional lower third is about more than just text and color. Consider these guidelines:
- Keep It Simple: A cluttered lower third distracts from the content.
- Choose Readable Fonts: San-serif fonts are popular for clarity on various screens.
- Use High Contrast: Text should be visible against your video background.
- Match Branding: Incorporate brand colors and logos for consistency.
- Time It Right: Show lower thirds only as long as needed to read comfortably.
By following these tips, you’ll ensure that your audience focuses on the content rather than getting distracted by overly flashy or poorly designed graphics.
Common Mistakes to Avoid When Creating Lower Thirds
Even experienced editors slip up. Here are some pitfalls to watch out for:
- Overly Long Lower Thirds: Distracting the viewer with text that lingers too long can detract from your video’s main content.
- Poor Positioning: If your lower third extends too high, it may interfere with important on-screen details.
- Illegible Text: Using fancy or overly stylized fonts can hamper readability.
- Lack of Brand Consistency: Random color palettes and mismatched fonts can weaken brand identity.
- Skipping Animation: A static lower third can feel unpolished; subtle movement grabs attention.
Avoid these mistakes, and you’ll make a lower third that’s both functional and visually appealing.
FAQs About Creating Lower Thirds Templates
What is a lower third in video editing?
A lower third is a text and graphic overlay that appears in the bottom area of a video. It typically includes a person’s name, title, or other important information. Lower thirds help viewers quickly identify speakers or key details.
How do I create lower thirds in Premiere Pro?
To create lower thirds in Premiere Pro, use the Essential Graphics panel. Select the Type Tool to add text, and use shapes or imported graphics for design elements. Animate these elements in the Effect Controls panel and save your work as a Motion Graphics Template for easy reuse.
What are the best settings for exporting lower thirds in After Effects?
Use a format that supports transparency, like QuickTime with ProRes 4444 or PNG sequences. Make sure your alpha channel is enabled and the render settings are set to Straight (Unmatted) for a clean transparent background. This ensures compatibility across various editing platforms.
How can I make reusable lower thirds templates?
Design your lower third in either After Effects or Premiere Pro, then save it as a Motion Graphics Template (.mogrt). You can reuse this file in multiple projects, customizing text, colors, and other elements to match each new video without starting from scratch.
What fonts and colors work best for lower thirds?
Choose clean, sans-serif fonts and high-contrast color palettes that ensure readability. Complementary colors also create a strong visual impact. Make sure your chosen colors align with your brand identity for a cohesive look.
Can I import After Effects lower thirds into Premiere Pro?
Yes, you can easily import After Effects lower thirds into Premiere Pro, especially if you export them as Motion Graphics Templates. Alternatively, you can render an alpha channel video file in After Effects and import it into Premiere for manual positioning and further editing.
What file formats are ideal for lower thirds templates?
Motion Graphics Templates (.mogrt) are ideal for Adobe workflows. QuickTime movies with ProRes 4444 support or PNG image sequences also maintain transparency. Choose a format that best suits your editing software.
How do I animate text in lower thirds?
In Premiere Pro, use the Effect Controls panel to add position, scale, or opacity keyframes to your text layers. In After Effects, you have more advanced options like the Graph Editor and various text animation presets. Subtle but smooth animations usually work best.
What are common mistakes to avoid when creating lower thirds?
Steer clear of unreadable fonts, excessive on-screen time, and poor color contrast. Also avoid clutter by keeping designs simple. Make sure animations are smooth and branding is consistent throughout.
How do I ensure my lower thirds are compatible with all devices?
Design your graphics in a 16:9 or relevant aspect ratio, and export using widely supported formats like .mogrt or ProRes 4444. Also, keep text large enough to be readable on smaller screens while maintaining clarity on larger displays.
With these guidelines, you now have a comprehensive understanding of how to make a lower third in Premiere Pro, how to export lower thirds in After Effects, and the best practices for designing and reusing these essential video elements. Whether you’re creating lower thirds for a short social media clip or a full-length documentary, the steps above will help you achieve a professional look that’s ready to go anywhere.


